Skillnad mellan versioner av "Kap 2 Programmeringsmiljön"
Taifun (Diskussion | bidrag) m |
Taifun (Diskussion | bidrag) m |
||
| Rad 1: | Rad 1: | ||
__NOTOC__ | __NOTOC__ | ||
| + | <big>Ons 20 sep, kl 9-12</big> | ||
| + | |||
| + | |||
{| border="0" cellspacing="0" cellpadding="0" height="30" width="100%" | {| border="0" cellspacing="0" cellpadding="0" height="30" width="100%" | ||
| style="border-bottom:1px solid #797979" width="5px" | | | style="border-bottom:1px solid #797979" width="5px" | | ||
| − | {{Not selected tab|[[Lektion | + | {{Not selected tab|[[Lektion 3 (C/Cpp 23)| << Agenda]]}} |
| − | + | {{Selected tab|[[Kap 1 Programmeringsmiljön|Genomgång 3]]}} | |
| − | {{Selected tab|[[Kap 1 Programmeringsmiljön| | + | {{Not selected tab|[[Övningar 3 (C/Cpp 23)|Övningar 3]]}} |
| − | {{Not selected tab|[[Övningar | + | {{Not selected tab|[http://www.mathonline.se/Cpp_innehall_strukt.pdf Innehåll & struktur]}} |
| − | {{Not selected tab|[ | + | {{Not selected tab|[[Lektion 4 (C/Cpp 23)|Nästa lektion >> ]]}} |
| − | {{Not selected tab|[[Lektion | + | |
| style="border-bottom:1px solid #797979" width="100%"| | | style="border-bottom:1px solid #797979" width="100%"| | ||
|} | |} | ||
| Rad 13: | Rad 15: | ||
<br> | <br> | ||
| − | = <b><span style="color:#931136"> | + | = <b><span style="color:#931136">2.1 Installation av Visual Studio</span></b> = |
<div class="ovnE"> | <div class="ovnE"> | ||
<big> | <big> | ||
| Rad 31: | Rad 33: | ||
| − | = <b><span style="color:#931136"> | + | = <b><span style="color:#931136">2.2 Konfiguration och användning av Visual Studio</span></b> = |
<div class="ovnC"> | <div class="ovnC"> | ||
<big> | <big> | ||
| Rad 54: | Rad 56: | ||
| − | = <b><span style="color:#931136"> | + | = <b><span style="color:#931136">2.3 C++ Console Applications</span></b> = |
<div class="ovnA"> | <div class="ovnA"> | ||
<big> | <big> | ||
Versionen från 23 juli 2023 kl. 21.39
Ons 20 sep, kl 9-12
| << Agenda | Genomgång 3 | Övningar 3 | Innehåll & struktur | Nästa lektion >> |
2.1 Installation av Visual Studio
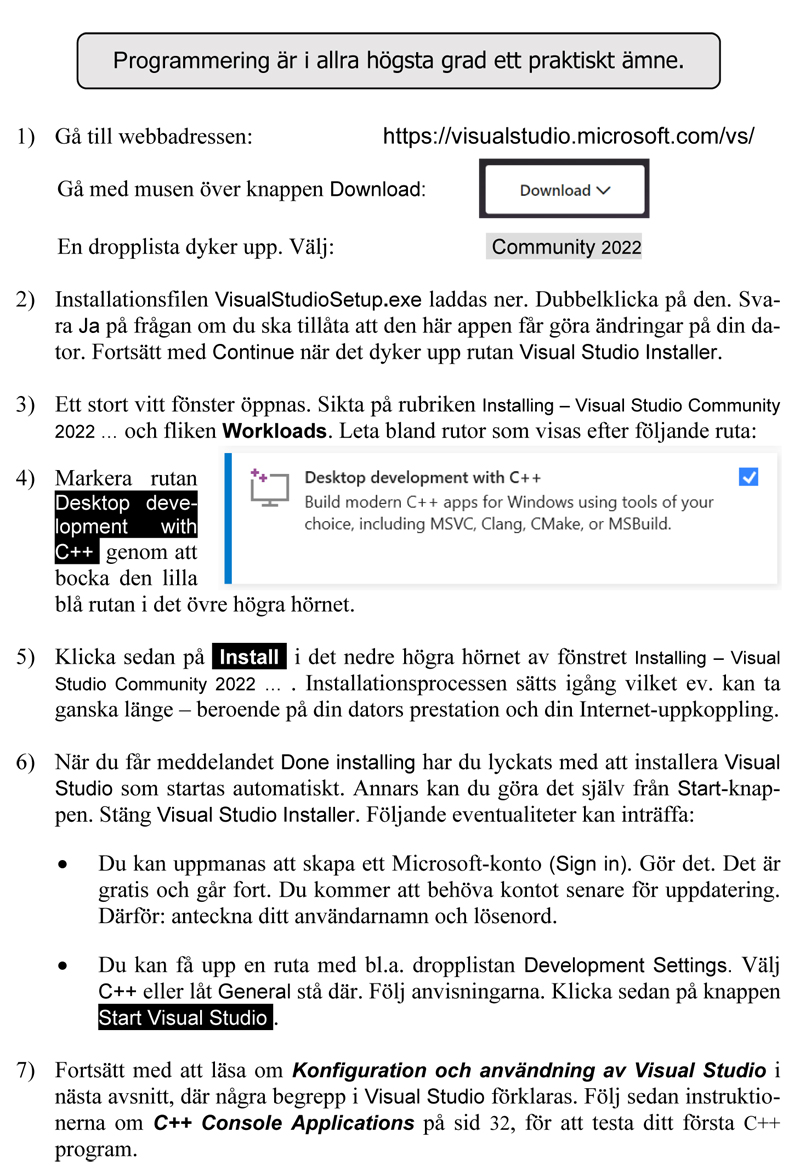
Vi vill installera Microsofts integrerade programutvecklingsmiljö (IDE) Visual Studio.
Anslut din dator med laddaren till elnätet och låt den vara ansluten under hela installationen!
OBS! Två olika programvaror:
Först installeras Visual Studio Installer som i sin tur installerar Visual Studio.
Följ instruktionerna nedan som även demonstreras under lektionen:
2.2 Konfiguration och användning av Visual Studio
Efter lyckad installation måste vi konfigurera Visual Studio för att kunna använda programvaran.
För att kunna göra det och förstå vad vi gör måste vi först redovisa några begrepp.
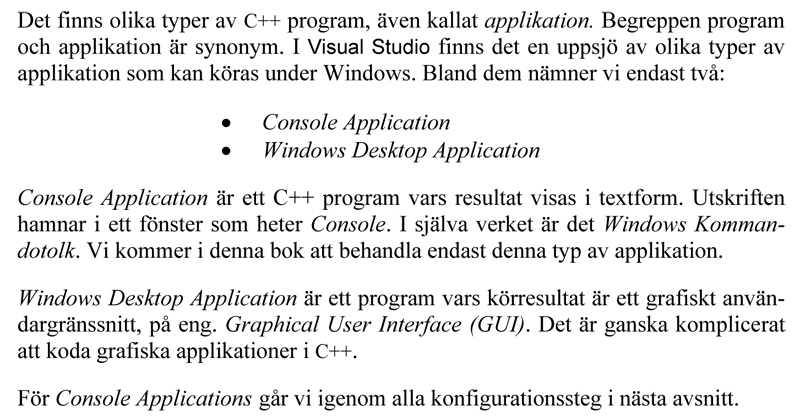
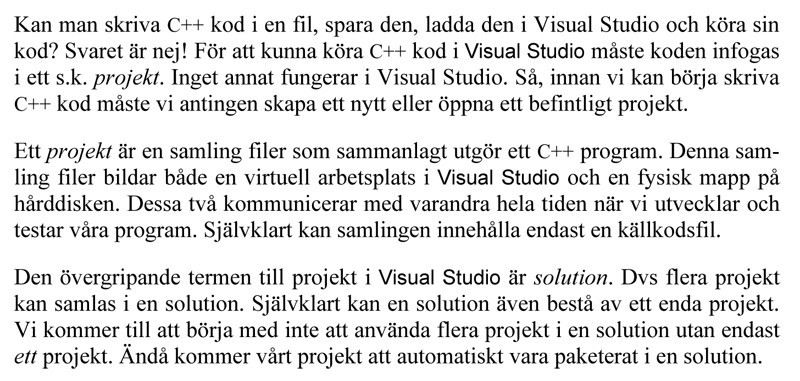
- Visual Studio begreppen: Type of application och Project.
Olika typer av applikation i Visual Studio
Projekt i Visual Studio
2.3 C++ Console Applications
Efter lyckad installation måste vi konfigurera Visual Studio för att kunna använda programvaran.
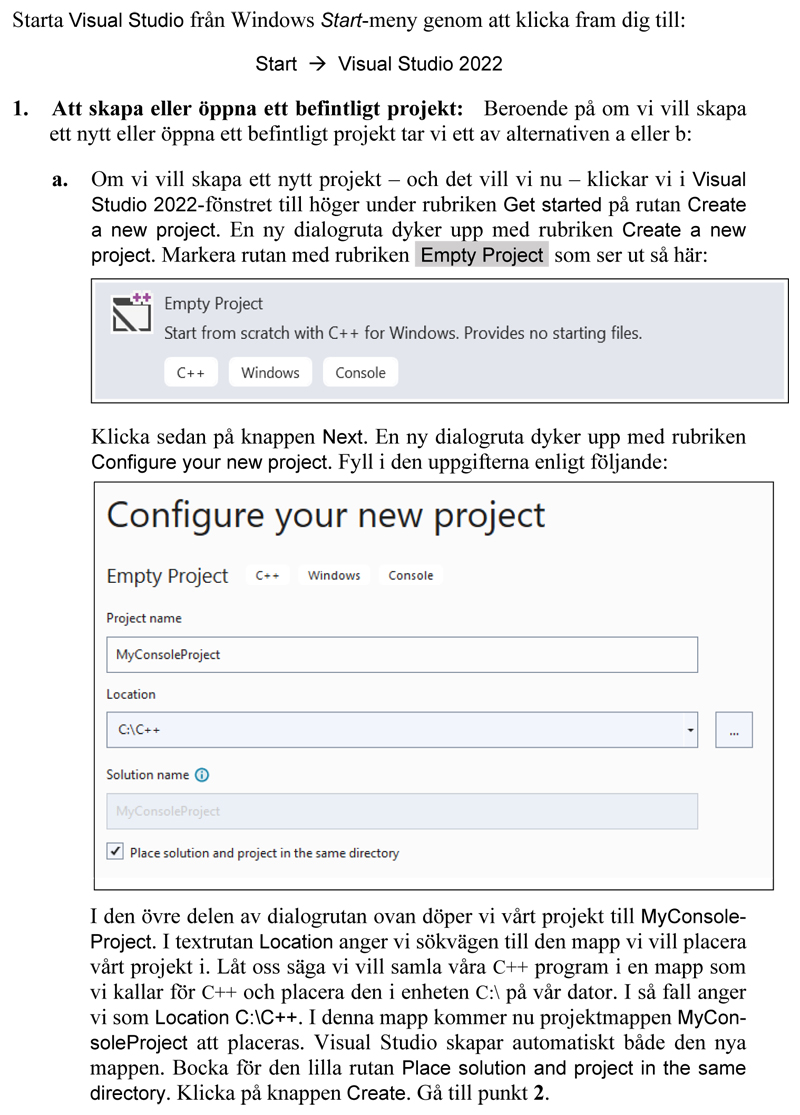
Av de olika typerna av applikation väljer vi att skapa en C++ Console Application.
Följ instruktionerna nedan:
Fortsätt i kursboken på sid 13-16 för att slutföra din Console Application.
Var noga med alla detaljer. Hellre långsamt men korrekt än snabbt och fel!
Gå vidare med Dagens övningar när du är klar med din första Console Application.
Copyright © 2023. All Rights Reserved.


